Andrea Guarino-Slemmons
Studio Ventilation Tutorial by Whit Slemmons

This is a detailed description of a low-cost, easy to build, yet very powerful ventilation system designed by Whit Slemmons for Andrea Guarino's teaching studio. This is a very effective ventilation system specifically designed for glass bead makers and silversmiths. It is designed to be easily set up by anyone in a portable mode where the tubing and fan is routed out a door or through a window or for a more formal teaching studio or permanent installation.
FAN:
The fan can take most outside weather as long as the discharge side opening is protected from direct rain (not facing upward). Further I have included a mobile design on wheels for those who live in an apartment or a place where a stationary installation is impractical.
The very quiet fan is a Fantech Model FR160, 289 CFM Max. (cubic feet per minute). Price about $180.00. Available at

TUBING:
The fan has a 6 in. inlet. You can easily buy 6in. Aluminum flex tubing to position up to your torch. The flex tubing is bent into a curved port underneath and close to end of your torch flame. Connectors are available to connect several lengths of flex tubing if necessary. The fan is waterproof so it can be mounted outside to remove the noise away from the artist. A 6 1/4 in. dia. hole can be cut in an outside wall to run the flex tubing through. Or it can be placed through an open window or door to the fan mounted outside. I recommend wrapping the joints with aluminum tape to minimize any leakage. Note: There is some turbulence caused by the ribs of the flex tubing however an adequate fan like the one recommended can overcome the small losses caused by this. An artist needs to be able to use flex tubing when curving around obstacles. Also, it is important to have a system that can be cheaply and quickly assembled rather than worry about small turbulence losses due to the ribs of the tubing. I recommend using one fan for each torch to make sure each has adequate ventilation.
WIRING:
The fan can easily be electrically hooked up by purchasing an extension cord of the length to go from the fan to an electrical outlet with a couple feet to spare. The extension cord must be capable of handling the 1 amp. required by the fan. Most extension cords can carry more than one amp but check to make sure. Then cut-off the end opposite the plug and trim back the insulation and connect the wires to the terminals in the fan connection box.
FAN MUFFLER (SILENCER):
Even though the fan is very quiet, I recommend using a muffler to reduce any noise to an even lower level. The silencer should reduce noise by 50%.
The 6 in. muffler or silencer is a Fantech Model LD6 and is available from several companies on the internet for about $70.00.
http://www.rewci.com/fafrseincefa.html
It has a clean straight through design which does not reduce the air flow.

INLET:
The enlarged piece at the inlet to the tubing at the torch is made from a 6 in. 30 Gv Side Take-off 30 that sells for about $10.00 and is available from:
http://www.hardwareworld.com/6in-30-Gv-Side-Takeoff-pC443MC.aspx
Cut off the notched edges and fold the remaining metal back towards the inlet to help direct the air into the tubing and reduce the rough edges. Cut off the tubing end of the fitting using a pair of tin snips. You should now have only the part that is flared out to a rectangular opening that will be located under the torch. The end of the tubing may have to be modified by cutting with a pair of heavy duty scissors. Tape this fitting onto the end of the tubing using aluminum tape to increase the intake area about twice that of the 6 in. tubing.
ALIGNMENT:
When aligning the vent system to the torch have the opening about parallel to the direction of the torch with the torch slightly above the metal of the ventilation system inlet when the fan is turned OFF. Once the tubing is bent into place, position the modified side take off unit on the end of the tubing. If it does not slope back enough, cut the top part of the tubing opening using heavy duty scissors starting at the bottom and cutting around the tubing towards the top with an increasingly wider cutoff portion until you reach the top and then cut down the other side reducing the portion cut off until you reach the bottom. This will give you a greater slant to the Side Take-off flange piece. Then attach with aluminum tape the side take-off flange piece to the tubing.
When the torch is lit the ventilation system will pull the end of the torch flame slightly down as it pulls all the harmful gasses into the system and away from the artists face. A weight with a wire attached and extending around the 6 in. tubing at the inlet can be used to secure the tubing in the correct position and to allow easy adjustments. In the studio shown in the photographs a 2 in. dia. Disk magnet is placed inside the tubing in a place where the aluminum tubing touches the table and ribs have been flattened. This allows the ventilation inlet to be easily adjusted in and out and left or right as it is aligned to the torch.
I am enclosing a photo of a quick set-up that has the tubing extending through an old outside door that isn't used. Make sure the motor is properly mounted to a simple support more substantial than that shown in this photo. I am also including photos of Andrea's new studio with a complete ventilation system for each torch. This is just five of the systems described here. With all five systems on, you can easily carry on a normal conversation in the studio.


PORTABLE VENTILATION SYSTEM:
I am also including photo's of the mobile system which is mounted on a furniture dolly. This allows the ventilation system to be rolled onto a balcony or outside a door held open to allow the 6 in. tubing to extend inside to connect to the torch bench.
COST:
I am making information on this system available because I don't want glass bead or jewelry artists to endanger their health for not having an adequate ventilation system. This system will only cost about $300 for each torch and can be assembled as a portable system in about 1 hour. A permanent installation will take a little longer.
VERSATILITY:
This ventilation system can also be used for other jewelry making operations. A small buffing motor and wheel can be placed in front of it to suck off particles created during these operations. Also soldering can be performed in front of the inlet to remove fumes created during soldering. When using enamels, pour the powder into dishes directly in front of the vent system. Also when rolling the powder on the bead hold the shallow dish directly in the opening of the ventilation system.
CAUTION:
I am not responsible for what people may do with this information. Please check with electricians and the building codes in your city to make sure everything is Okay!
THE PHOTOGRAPHS BELOW SHOW DETAILS OF THE VENTILATION SYSTEMS:
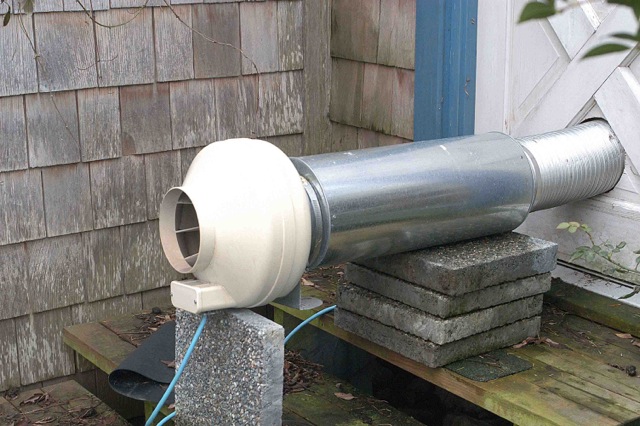
1. A quick ventilation setup with the flex tubing running through a whole in an old door. Fan should be mounted with a secure base so it will not fall over not like shown in the photo.
Added Note: I am enclosing this photo of a quick set-up that has the tubing extending through an old outside door that isn't used. Make sure the motor is properly mounted to a simple support more substantial than that shown in this photo.
2. Just the propane flame showing the power of the system.
3. Normal bead making torch flame (Note: Tip of flame bent towards vent.)
4. Andrea's teaching studio
Added Note: This photo shows Andrea's new teaching studio with a complete ventilation system for each torch. This is just five individual systems like the one described here. With all five systems on, you can easily carry on a normal conversation in the studio.
5. The back side of the studio showing the five individual ventilation systems.
Added Note: The black cylindrical section between the muffler and the fan is a rubber boot I made by cutting a piece of black rubber gasket material from the hardware store, (about 1/8 in. thick) 6 in. wide and long enough to wrap around the fan inlet and over lap about 3 to 4 in.. I needed the 6 in. length to allow the motor to be mounted into the concrete foundation, however usually only about 4 in. wide piece is required. (Fantech also makes connectors from the fan to the muffler that are about 2 in. wide and work just fine.) I used contact cement to glue the over lapped area to provide a seal and stainless screw type hose clamps to attach it to the fan and the muffler. This boot acts as a vibration insulator between the fan and the rest of the mechanical parts so no mechanical sound is transmitted. The fans which draw about an amp. Are controlled by X-10 available at:
http://www.x10.com/automation/x10_am466.htm
These are three-wire controllers that plug connect from the fan to a terminal strip. This allows Andrea to easily turn on any combination of fans from a $15 controller. I prefer this older style units with dial wheels to set the code. A lot of these details are not necessary however I wanted to make it the quietest system possible within reason.
6. Portable ventilation system outside studio door with 6 in. tubing extending through the door to the torch bench.
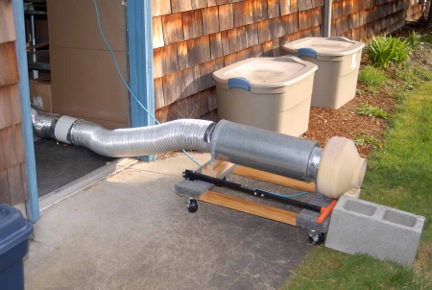
7. The torch bench hooked-up to the portable ventilation system.